Hi, having searched and reading about many blogs I thought why not to create my own blog and share about my experience and little bit of knowledge what I have gained from all these days about blogs and have decided to write my first blog and would like share my experience while creating my blog in WWW.blogger.com.
Blogger is a platform to publish the blog which is owned by Google. Blogger give the platform to create a free blog and host the blogs at its sub domain blogspot.com at free of cost. You can also get your own domain like .com, .org etc with annual fees. There are many other platforms for creating blog for example wordpress, tumblr etc for time being let us concentrate on blogger.com.
The reason for writing on blogger.com is I really found it user friendly compared to other platform so I would like to suggest for beginners to try first in bloggers to learn and improve your blog writing and webpage designing skills through bloggers.com.
Many questions arise in your mind before creating the blog and may get stuck up at the first step i.e how to create the blog account, So I thought to write about step by step involved in creating a blog through blogger.com.
Step by step process of creating a blog page is explained below
1. As a first step open www.blogger.com from your browser, if you have your google account i.e Gmail account you could use the same for bloging purpose also or if you want to keep the blogger account separately create one new google account and login using the google account.
 |
| Blogger.com |
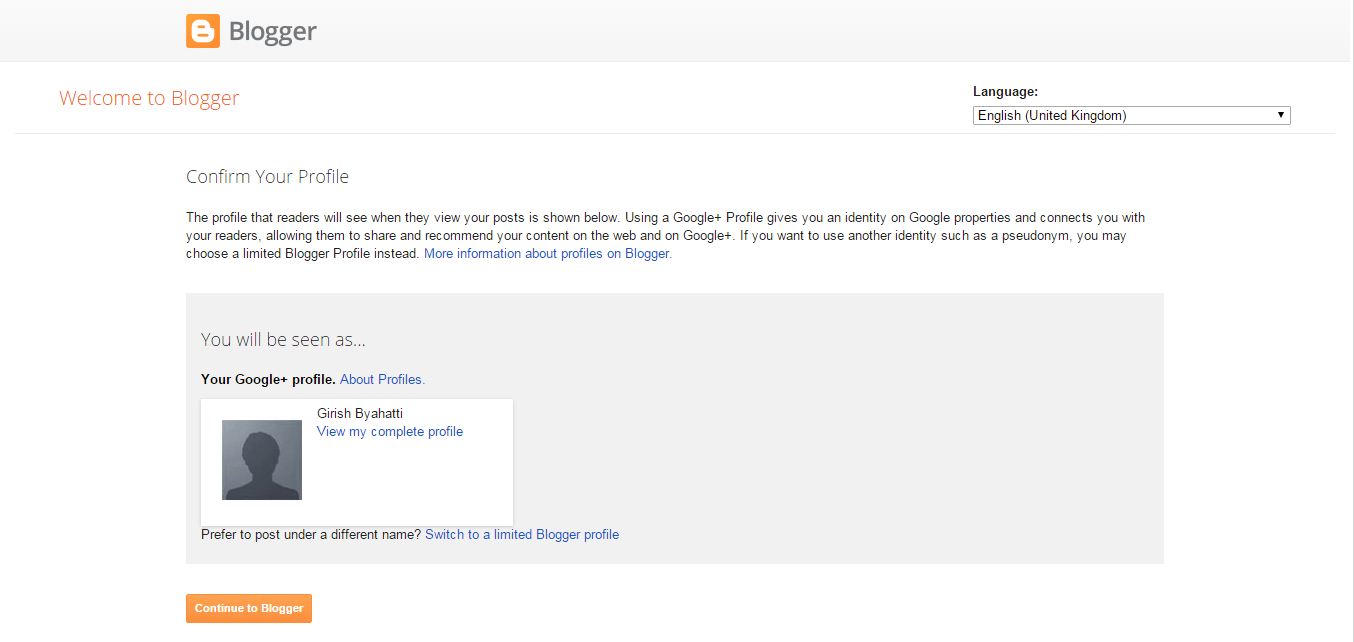
Login with your google account.
2.Once you login you get the below page
3.

To start your new blog click on new blog and proceed further then you get the below screen
4.

> Title is the name of your blog which will be displayed on the top of your blog page (i.e Header line) GAB-For Success in my case.
> Address is the url of your blog page, for free domain your url will ends with .blogspot.com i.e www.(name).blogspot.com. For ex my blog url is www.gabalways.blogspot.com. Choose your address carefully because this will be your free blogsite in which you will be posting all your future posts.
> Template choose your template of the page i.e how your page should look as far as possible keep it very simple.As you get familiar with blog you can customize and learn one by one.
Now your are done with the creation of blog but still you need to work more on your blog to make it easy and look impresseive before posting your first post.
5.Once you are done with the above steps you find the below screen

In the above screen you find 11 points on the left hand side let us understand briefly about these points which is explained below:
We will not go in a order, so let us start first with layout because this will be the layout of your blog site.
1.Layout:-Click on layout and start designing your blog page as per your style.Once you click on layout you find the below screen

Fevicon:- Its the icon which is displayed on your tab for ex: Now you can see on top of blogger.com tab you find the small icon with symbol "B" in white and orange colour background that's the icon for blogger. Another example you could find the "G" symbol icon on my gabalways.blogspot.com site this icon displays my fevicon i.e my brand icon.So if you want to brand your blog I suggest you to create your own icon and can convert it into fevicon through online converter. You could find many sites in google to convert your icon to fevicon just by searching convert images to fevicon.
Navbar: Its the navigation bar on the top of your blog site with options like share option, search option,design option etc

Cross Column: Cross column is the space on your blog page just below the header line.This space you could use for any of the purpose by clicking Add gadgets.Once you click on the add gadgets there will be popup window in which you find many of the gadgets which you could choose to add in this space.

For example in gabalways.blogspot.com in this space I have added About Me and Contact Me pages.How to create the page will see in later section.But once you create the page you could find these pages in the pop up window which will be displayed once you click on the add gadget and then select the pages to add here.So you find the About me on the cross column once you click on the About me you find the details which I have entered in the page called "About Me".Similarly Contact me can also me created.You can create as many as pages as you need according to your blog page design.
Main: This is the space where your main post will be displayed.Creating the post will see once we complete the layout section.
Similarly side bar "right-1" "left-1" are the areas in you blog page where you wish to add the gadgets or else you could leave this space empty also.This space could help you once you start adding adsense and all.You can change the layout of these side bar, footer and all by choosing the right template as per you requirement from the template section.
Footer: This is the bottom space which can be used to write the copyright text it is optional, privacy policy,Disclaimer etc..
2. Let us discuss about Template:
Template is the blog page template where you can decide the page color, Background color,Header text style color, Cross column text style color etc.This you could change by customizing the template.

From the above screen you could find that how customization of the template can be done.
3. Pages:

Once you click on the pages and go to New page tab you find the above screen.First write the page title i.e page title should represent what the page contains.Like if you write the Page title as About Me then the page should contain the details about you.Then you could add the detailed description in the page below.You could add text,links, photos, Videos etc.Once you finish with the page then save the page and click on publish. Once you publish the page this page you could find in the gadget list in the layout.
If you want to place this page in you blog then go back to layout and in add gadgets add the pages then find the below popup window

You could place your page in the blog page by saving the page.You could add as many as page you want and can arrange the order as per you wish.In my blog you could find two pages About Me & Contact Me which has been placed in the cross column gadget space.
4.Post: Now let us discuss about the post
Till now we discussed about the blog page design and presentation part which could create the impression of your blog on the viewers.However the viewers have arrived to your blog page to check out about your post not the design and presentation.So till now what we have done is to boost your post and make the viewer not boring.
To write a post click on new post and you find the below screen

Write the title of your post in the post title and detail description of your post in the page below.Similar to the page writing you could add Text,photo,links videos which you like to share in your post.You could write as many as post you want in the blog.
5. Comments: This is the section where the comments on your post by the viewers is displayed.
6.Overview:-It is the overview of your blog i.e once your blog is created and you start posting in this you find the overall summary of your blog starting from number of views of your blog day wise, number of view of your post etc. In detail this would be the summary sheet of your blog.
7.Stats: In this section the page views stats and the area form where the pages is viewed will be displayed.
8.Earnings:This is the section where you could add the Google adsense account if it is activated.For this section to get activated you should include quality posts and should not be inactive user.
9.Campaigns: Blogger also give the option of campaigning your blog.
10.Settings: Where you can make your basic setting to your blog.
Hope with this your blog is ready and you can start writing your posts and keep updating your blogsite.
With this I conclude my first post and hope this could help reader to create there first blog.
You could also find how to delete the blog in the section "How to delete the blog?"
Your suggestions and inputs are always welcome.
Thankyou
No comments:
Post a Comment